How to Go About Cabinet Painting
Cabinet Painting can give your home a dramatic look at a reasonable cost. However, it can be a big project. Start by removing all cabinet doors and hardware. Label hinge locations so you can reinstall them correctly.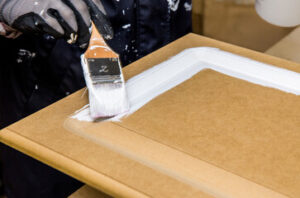
Apply a stain-blocking, oil-based primer. If you prefer, you can use a water-based latex primer that’s low or no VOC. Read on Painting Inside Of Cabinets to learn more.
Whether you’re looking to update your kitchen cabinets with a fresh coat of paint or you’re doing a full remodel, sanding the cabinet doors and drawers is an important step before painting. This will remove any existing scratches or dings and ensure that the new finish will adhere to the wood. It’s also a good opportunity to touch up any chips or blemishes with wood filler. Once the surface is smooth and ready for a new coat of paint it’s time to select your color.
The type of paint you choose will depend on the overall style of your kitchen. If you’re going for a more rustic look, natural-looking finishes like eggshell and satin work well. For a more polished and elegant space, try a glossy finish like high-gloss or semi-gloss. A glossier finish is more reflective and will highlight any detailed carvings or hardware you have on your cabinetry.
You’ll also need to decide between a water-based or oil-based primer. It’s best to consult with a paint expert at your local store to determine which type is right for you. A stain-blocking oil-based primer is a great choice because it will help prevent dark or stained surfaces from showing through the top coat of paint.
Before applying any paint to the surface of your cabinetry you should make sure it is clean and properly prepped. Any grease or other contaminants on the surface of the wood can cause the new paint to bubble or flake. It’s also a good idea to use a degreaser specifically formulated for wood surfaces to get the job done.
Once the surface is clean and sanded you should apply the first coat of paint to the cabinet doors and drawers, waiting 24 hours in between each coat. When the final coat is dry you can reinstall the doors and drawers, making sure to wipe off any excess paint with a damp cloth or tack towel. If you’re feeling especially ambitious, you could try using a spray gun for a more seamless finish. Just be sure to protect your walls and backsplash from overspray with plastic sheeting.
MDF
Medium-density fiberboard (MDF) is a building material that’s used for items in your home, including kitchen cabinets, bathroom vanities, baseboards, bookshelves, and interior doors. Over time, MDF can get chipped or dingy, but with a little bit of work, you can re-paint it for a fresh, new look. This is a great way to refresh your home without spending a fortune on contractor prices.
When painting MDF, you must follow specific steps in order to achieve a high-quality finish. Before you begin, it’s important to clean the MDF and sand it to remove any dust or dirt that may be present. Use a universal cleaner such as Zinsser Universal Degreaser & Cleaner and then wipe it down with a cloth to ensure that there is no residue left behind.
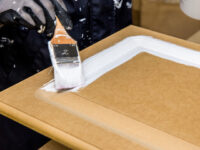
Once the MDF has been cleaned and sanded, you must apply a primer to it in order to ensure that it will accept paint properly. This can be done using a brush, roller, or sprayer. Be sure to let the primer dry completely before moving on to the next step.
Now it’s time to apply the first coat of MDF paint. This can be done with a brush, mini-roller, or sprayer. Be sure to apply a thin coat of paint, and allow it to dry according to the manufacturer’s instructions.
If you want to give your MDF a more luxurious finish, try shellac. This is a resin secreted by the female lac bug, and it gives MDF a shiny, protective finish that’s resistant to physical damage.
Once the MDF paint has been dried, it’s time to add a topcoat. Again, be sure to use a clear, water-based polyurethane, and allow it to dry for an hour or so. This will protect the MDF from water damage and other stains, and will also make it easier to wipe down.
Once the MDF has been painted and allowed to dry, it’s time to reattach the hardware. It’s recommended that you wait at least an hour after applying the topcoat, and then re-adjust the screws as necessary.
Alder
Alder is a type of softer hardwood that works well for painted cabinets because it’s less dense than maple and takes paint very well. However, it may not hold up to heavy use as well as a more traditional hard wood like oak. For this reason, if you are planning to do a wire-brushed or distressed look with your cabinets, it may not be the best choice for alder.
When stained, knotty alder can bring a rustic elegance to any kitchen. It’s a great option for those who want their cabinetry to have a more natural or organic ambiance. Its imperfections, such as pinholes, open and closed knots of different sizes, worm holes, worm tracks, bird pecks, mineral streaks, grain variations and knot holes up to 3/4-inch in diameter, add character and visual interest to the cabinets.
Knotty alder can be painted, but it’s a good idea to seal the knots before painting. This will prevent the knots from deforming and popping out of the surface of the wood. It’s important to use a high-quality shellac sealer that is tinted to match the color of the finish you’re going with.
Clear alder cabinets are often chosen for modern kitchens, as they have a smooth surface and can be sanded down to a smooth finish. This makes them an excellent base for a variety of paint colors that can be used to create a unique kitchen design.
It’s best to sand down all of your cabinets and drawers to make them smooth before starting to paint. You’ll also want to remove all of the cabinet hardware and clean all surfaces thoroughly before you start to paint. After sanding, clean all surfaces again using a shop vac with a brush attachment, and then wipe the sanded areas down with a damp rag or tack cloth.
Before you begin, decide if you’re going to use a sprayer or a brush. It’s best to start with the back sides of the cabinet doors and drawer fronts, then move on to the face frames and finally the insides of the cabinet boxes. Be sure to give yourself plenty of time to complete the project, as cabinet painting can be a messy and time-consuming process.
Pine
Pine is a great material to use for cabinet painting. It is a durable material that is also easy to work with. The key to getting a good finish on pine is to choose the right type of paint. You can achieve a beautiful wood grain effect with a water-based satin or gloss, but the finish will not be as long-lasting as an oil-based finish. If you’re not sure what kind of finish to use, take your piece to your local hardware store and ask the professionals what they recommend.
Before you start to apply your chosen paint, make sure you have sanded the surface down and prepared it for paint. You will need to lay down a drop cloth ($7, Amazon) to catch any drips and protect your flooring and backsplash. Then, using a high-density foam roller or a brush, apply a stain-blocking and bonding primer to the entire surface of your cabinets and let it dry according to the manufacturer’s instructions.
Once the primer has dried, you can begin to paint your pine furniture. Be sure to choose a high-quality acrylic latex or acrylic enamel paint that is designed for use on pine. These types of paints are low-odour and will dry quickly. They are also formulated to resist cracking and peeling.
The first coat will need to be thick enough to hide any scratches or blemishes. If you’re going for a rustic look, consider applying 2 to 3 additional coats. Make sure to wait 24 hours between each coat.
If you’re aiming for a smoother finish, try painting your pine furniture with chalk paint. This paint is incredibly forgiving and will provide you with a smooth, flawless finish. It’s also easily distressed, which makes it perfect for the popular shabby chic look.
To get a nice, even color on your pine furniture, apply two to three coats of paint. Be sure to let the last coat dry completely before reinstalling your doors and drawers. If you’re unsure how many coats of paint your pine will need, ask the experts at your local hardware store for advice. They will be able to help you find the right color and formula for your project.